I recently had to setup an Azure infrastructure deployment pipeline for a new project and decided to experiment with GitHub Actions for workflow automation. The documentation for both Terraform and GitHub Actions is great, but I didn’t find instructions to do exactly what I wanted, so I decided to share my findings in this blog post.
Hopefully you find this information useful and it saves you some time. If you notice any issues with the approach or have other suggestions, please share your feedback in comments!
1. Prerequisites
1.1. GitHub repo
Create a new GitHub repo for Terraform configuration files (or use an existing repo if you already have one).
If creating a new repository, check the Add .gitignore option and select the Terraform template.

If using an existing repo, update your .gitignore using the GitHub’s Terraform .gitignore template.
Clone the GitHub repo to your local machine.
1.2. Azure CLI
Download and install the Azure CLI.
Authenticate with Azure using the az login command.
If you have access to multiple Azure subscriptions, select a specific one by running az account set -s <subscription-id>.
You can see the list of subscriptions you have access to by running az account list.
1.3. Azure service principal
You need to create an Azure service principal to run Terraform in GitHub Actions.
Run the following command to create the service principal and grant it Contributor access to the Azure subscription.
az ad sp create-for-rbac --name "sp-hello-azure-tf" --role Contributor --scopes /subscriptions/<subscription-id> --sdk-auth
Save the output of the command. You’ll need this information later in the process.
For more information, please refer to Authenticating using a Service Principal with a Client Secret in Terraform docs.
1.4. Terraform
Download Terraform and ensure it’s in your system’s PATH.
Create a Terraform backend storage account and container.
az group create -g rg-hello-azure-tf -l northcentralus

az storage account create -n sahelloazuretf -g rg-hello-azure-tf -l northcentralus --sku Standard_LRS

az storage container create -n terraform-state --account-name sahelloazuretf
2. Terraform configuration
Create a new file main.tf in the Git repo.
provider "azurerm" {
  version = "=2.0.0"
  features {}
}

terraform {
  backend "azurerm" {
    resource_group_name  = "rg-hello-azure-tf"
    storage_account_name = "sahelloazuretf"
    container_name       = "terraform-state"
    key                  = "terraform.tfstate"
  }
}

resource "azurerm_resource_group" "rg-hello-azure" {
  name     = "rg-hello-azure"
  location = "northcentralus"
}
Run terraform init to initialize Terraform.
You can now run terraform plan and see the execution plan.
This Terraform configuration allows you to test changes locally and review the execution plan before committing the changes to Git.
3. GitHub Actions
Create a folder .github and a subfolder workflows in the Git repo.
Next, we’ll create a couple of workflows based on the GitHub Actions Workflow YAML section of Terraform documentation.
3.1. Pull request validation workflow
Create a file terraform-plan.yml in the workflows subfolder. Replace the <client-id>, <subscription-id> and <tenant-id> with the values from the output of the command executed in step 1.3 above. We’ll take care of the ARM_CLIENT_SECRET value later.
name: Terraform Plan

on:
  pull_request:
    branches: [ master ]

jobs:
  terraform:
    runs-on: ubuntu-latest

    env:
      ARM_CLIENT_ID: <client-id>
      ARM_CLIENT_SECRET: ${{secrets.TF_ARM_CLIENT_SECRET}}
      ARM_SUBSCRIPTION_ID: <subscription-id>
      ARM_TENANT_ID: <tenant-id>

    steps:
      - uses: actions/checkout@v2

      - name: Setup Terraform
        uses: hashicorp/setup-terraform@v1

      - name: Terraform Init
        run: terraform init

      - name: Terraform Format
        run: terraform fmt -check

      - name: Terraform Plan
        run: terraform plan
This workflow will automatically trigger on all pull requests into the master branch and generate Terraform execution plan for the proposed change. The pull request approver can then easily review the change without having to pull the branch and generating the execution plan locally.
3.2. Apply changes on merge
Create another file terraform-apply.yml in the workflows subfolder. Same as before, replace the <client-id>, <subscription-id> and <tenant-id> with the values and leave the ARM_CLIENT_SECRET as-is for now.
name: Terraform Apply

on:
  push:
    branches: [ master ]

jobs:
  terraform:
    runs-on: ubuntu-latest

    env:
      ARM_CLIENT_ID: <client-id>
      ARM_CLIENT_SECRET: ${{secrets.TF_ARM_CLIENT_SECRET}}
      ARM_SUBSCRIPTION_ID: <subscription-id>
      ARM_TENANT_ID: <tenant-id>

    steps:
      - uses: actions/checkout@v2

      - name: Setup Terraform
        uses: hashicorp/setup-terraform@v1

      - name: Terraform Init
        run: terraform init

      - name: Terraform Apply
        run: terraform apply -auto-approve
This workflow will automatically deploy changes merged to the master branch. You’d want to make sure that the master branch is protected and all changes successfully pass the pull request validation before they get merged.
3.3. Create the repository secret
The final step of the GitHub repo configuration is creating the TF_ARM_CLIENT_SECRET secret referenced by the workflows.
Navigate to the repository Settings page, then select Secrets in the left nav. Create a new secret TF_ARM_CLIENT_SECRET using the client secret value from step 1.3.
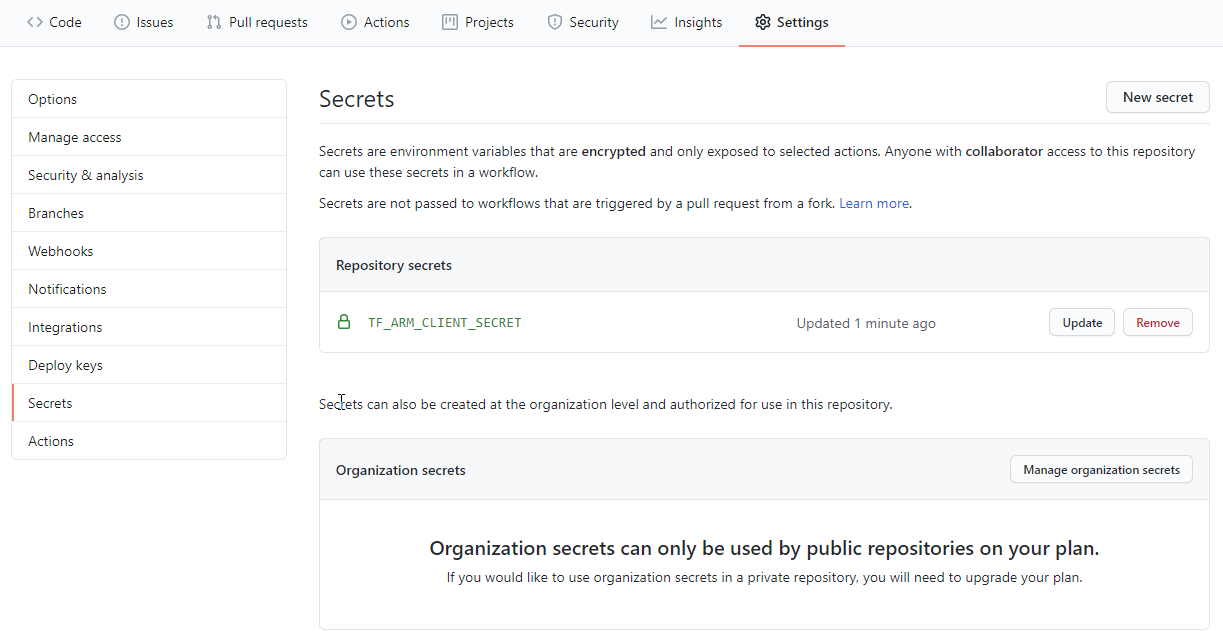
You can learn more about GitHub secrets at Creating and storing encrypted secrets.
4. Test the workflow
All pieces are now in place and we can start using the new GitHub Actions workflows.
4.1. Validate changes
Checkout a new branch using git checkout -b <branch-name> and commit your changes.
Publish the branch and create a pull request.
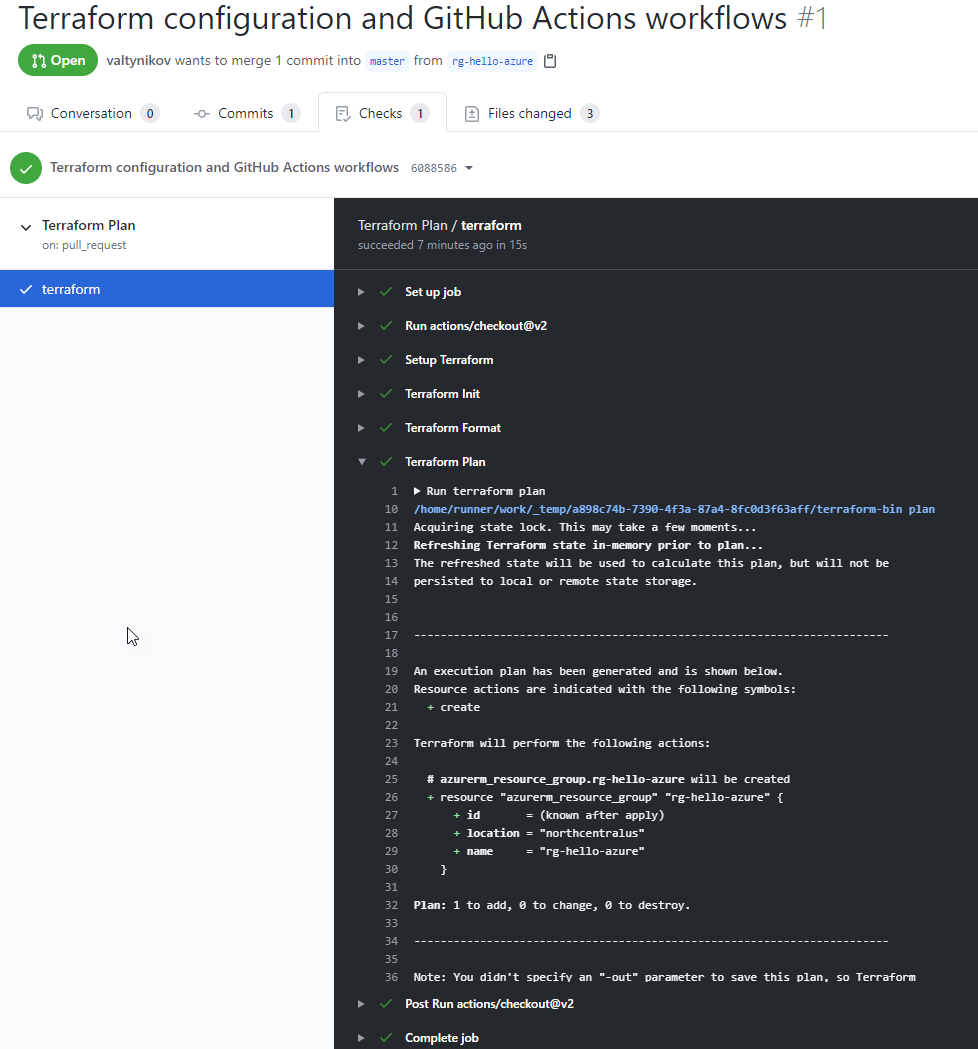
You should see the Terraform Plan workflow kick off automatically after a few seconds.
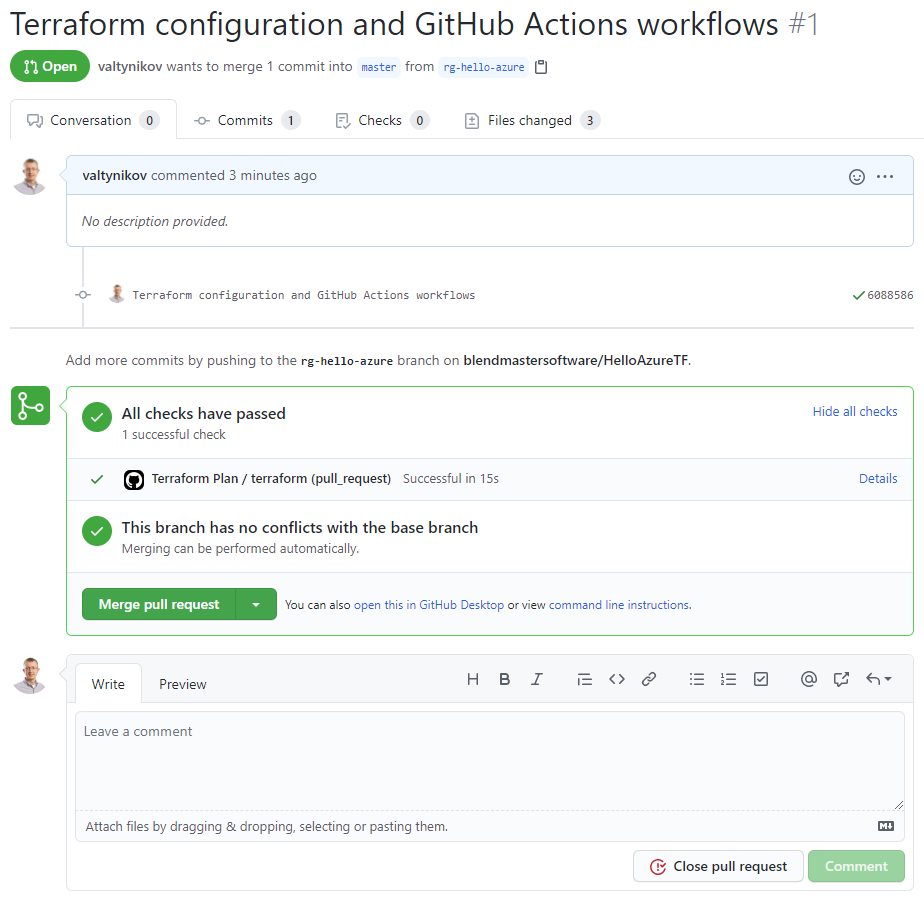
Click on Details and drilldown into the Terraform Plan step to review the execution plan.
4.2. Apply changes
If you are satisfied with the Terraform plan, merge the pull request.
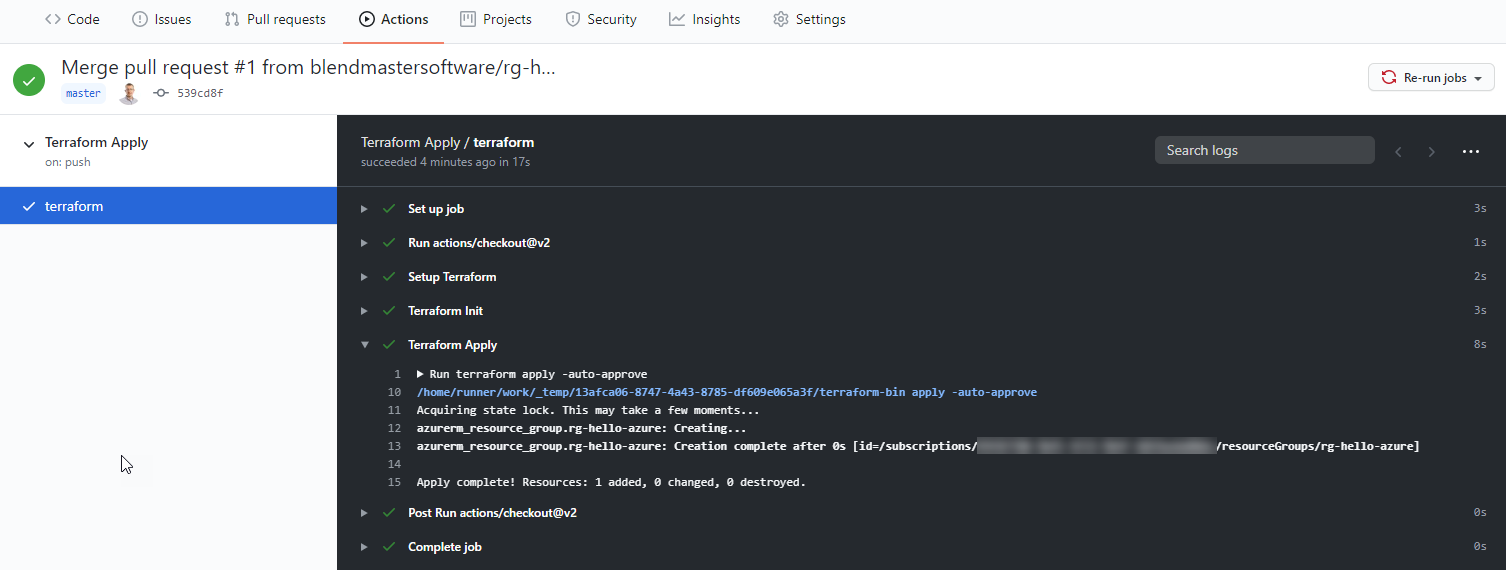
Navigate to the Actions tab. You should see the Terraform Apply workflow kick off automatically after the merge.
Drilldown into the Terraform Apply logs to verify that the changes were deployed.
Thoughts?
Do you have any comments, concerns or suggestions? Please feel free to share your thoughts in the comments below. I’d love to hear your feedback!
